Information And Procedure For Checking Brake Cylinder Installation. The following information is to be used with the vehicle brake calculation information and brake cylinder manufacturers recommendations.
Brake Chamber Vent Plugs

BPW Diaphragm/Piston Brake Cylinder (Disc Brake)
")
INSTALLATION INSTRUCTIONS
1. Ensure that the brake cylinder type and part number conform to the brake calculation.
2. BPW disc brake cylinders are handed to ensure uniformity of the pipework installation.
3. Ensure that the caliper mounting interface is clean to accept the rubber seal of the brake unit. Do not paint the caliper to brake unit clamping interface.
4. If fitting to a new caliper ensure that the yellow plastic transit plug is removed from the caliper.
5. Fit the brake cylinder to the caliper using the supplied fixings. Torque to 200Nm ± 20Nm.
6. Remove the lower plastic vent plug from the service housing. It is important that the vent pipe is positioned to the top.
7. Connect the air pipe to the brake cylinder port. • Port 11 - Service Section • Port 12 - Secondary Section 8. Wind in the cylinder compression bolt.
9. Adjust brakes as per manufacturers recommendations. Test the brake cylinder for correct operation.
SAFETY NOTICE Under no circumstances should any attempt be made to open the spring brake unit due to risk of personal injury from the stored spring energy.
BPW Brake Cylinders

INSTALLATION INSTRUCTIONS
1. Ensure the brake cylinder type and part number conform to the brake calculation.
2. Using the tool provided compress the internal spring. Cut the push rod length as per the brake calculation ensuring that the cylinder is in the fully off position. Fit the clevis pin to the cylinder. Tighten the lock nut to 80Nm.
3. Ensure the mounting interface is clean and flat to accept the brake cylinder. Do not paint the air cylinder mounting bracket to brake cylinder interface.
4. Fit the brake cylinder to the correct mounting bracket position (as per the brake calculation) using the supplied mounting fixtures. Torque to 180Nm - 210Nm.
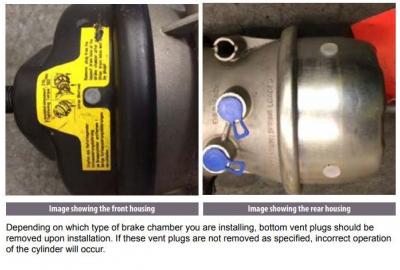
5. Remove the lower plastic vent plugs from the front and rear housing.
6. Connect the air pipe to the brake cylinder port.
• Port 11 - Service Section
• Port 12 - Secondary Section
7. Mount to the corresponding lever length position as per the brake calculation.
8. Ensure the trailer is chocked and secure. Release the handbrake and remove the cylinder compression tool and stow. Apply the handbrake.
9. Adjust the brakes as per manufacturers recommendations.
10. Install the return spring.
11. Test the brake cylinder for correct operation.
SAFETY NOTICE Under no circumstances should any attempt be made to open the spring brake unit due to risk of personal injury from the stored spring energy.
NOTE All blue text applies to the Double Diaphragm Brake Cylinder ONLY.
BPW Single Diaphragm Brake Cylinder (Disc Brake)
")
INSTALLATION INSTRUCTIONS
1. Ensure that the brake cylinder type and part number conform to the brake calculation.
2. BPW disc brake cylinders are handed to ensure uniformity of the pipework installation.
3. Ensure that the caliper mounting interface is clean to accept the rubber seal of the brake unit. Do not paint the caliper to brake unit clamping interface.
4. If fitting to a new caliper ensure that the yellow plastic transit plug is removed from the caliper.
5. Fit the brake cylinder to the caliper using the supplied fixings. Torque to 200Nm ± 20Nm.
6. Connect the air pipes to the air port.
7. Remove the lower plastic vent plug from the service housing.
8. Adjust brakes as per manufacturers recommendations. Test the brake cylinder for correct opperation

